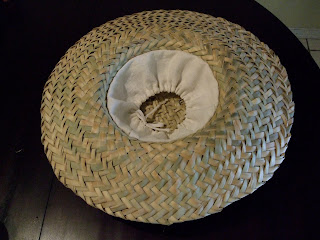
The first step is weaving the extra straw back into the hat (or you could cut it off if you aren't feeling that ambitious). It took me about an hour and a half to do it, but it was strangely satisfying work! My best advice is to trim the ends of the straw so they are blunt instead of pointy, and to weave the parts on the flat of the brim before you do the edges.

Next, I wet the hat and weighed down the brim with a bunch of bowls so that it would lay flat. Then I placed a large bowl on the crown plus a bit more weight to push it down. These hats are like Chinese handcuffs in the way they are woven - if you push down on them, they get wider, which works wonderfully for making the wide crowns that are so characteristic for the hats from this period.

I left it like this to dry overnight, and now it holds its new shape. Easy peasey!
The crown is a good bit wider than my head now, so I sewed a strip of fabric to the inside with a drawstring that ties in the middle. This helps to stabilize the hat so it doesn't bobble around so much, and by adjusting how tightly I tie the cord, I can adjust how high it sits on my head.
Once the straw is shaped, you can cover it with fabric, like I did for my black 1910's hat. I made that one with a beachcomber too, but I shaped the brim up by tying rubber bands around it instead of laying it out flat. You can also paint or dye these hats, but I think I'm going to leave my straw plain since a rustic look seems appropriate for a summer picnic.
Here's a crappy picture of it on my head so you can get a feeling for the scale, but you'll have to wait until this weekend to see the decorated finished product!


8 comments:
I love it.
Awesome, as always! ... hmmm, I think I have one of those hats stuffed up in a closet somewhere. :D
Very nice... I am posting my Edwardian hat making adventures tonight as well. That was my project over the weekend. I need some plumes and foofy stuff for it though and I have to wait till Friday... Looking foward to Saturday!
Awesome! And--I have the same dishes as you! Now I feel extra super-cool. :)
ooh, wow brilliant...I was just wondering what hat to buy to reshape. How did you attache the drawstring bit to the hat? Glue or sewing?
Hi Lady D - I'm glad this was helpful! I think I remember stitching it on with a curved needle.
Love this article, I too buy cheap straws here in England to re-shape. I've never considered dyeing them, have you tried it? What did you use? kind regards,Kate.
découvrez ici Gucci Dolabuy conseils supplémentaires YSL Dolabuy page Web Dolabuy Louis Vuitton
Post a Comment